I knew as soon as I saw this blog post with a wonderful tutorial from Whitney, that I HAD to make these cool plaques!
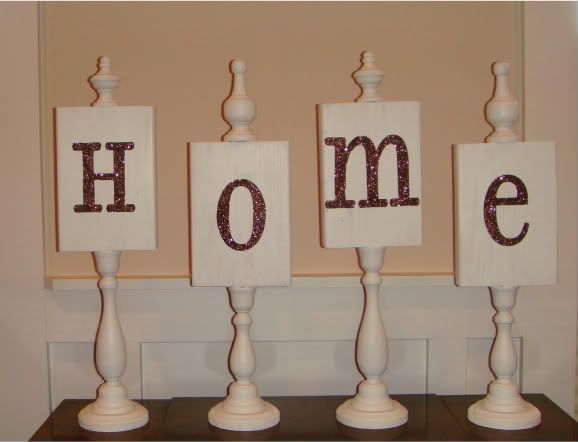
I changed mine up a bit, I changed the color to Totten's Inlet (Valspar). Instead of burlap I decided I wanted to be able to change mine up for the seasons or whatever, so I used my Cricut machine to cut out the HOME letters. You can cut them out of vinyl but I used white contact paper. If you don't have a die cut machine you can find precut vinyl in many craft stores already cut out and your local scrapbook store probably has machines available to use for a small fee. I then airbrushed the white contact paper with E44 Clay and then used a thick coat of Mod Podge Matte as the glue and sprinkled Makeing Memories Brown glitter over the top. I let them dry for about an hour before I peeled the backing off and placed them on the wood.
Then because the backs were painted and looked bare I decided I wanted to be able to use them too so I was searching Martha's website and came across this and that was it! Here is how that turned out.

Isn't that too cool! I made the chalkboard paint the same color as the plaques and used colored chalk for the letters. I can even make my own color of chalk to use on this too! ( I haven't done that yet) My biggest issue with this is that I went in thinking that I could draw or hand write on this side but I did not like my drawings or handwriting so... I used my handy dandy Cricut again and cut out the letters LOVE and then used the reverse of the cut outs as a mask for the letters. I like how it turned out.
I would love to hear from you so please let me know what you think!
Linked up with:


Linked up with:


These are adorable! I love how you made them reversible with two separate sayings! Love it!
ReplyDeleteWay cute! Good thinking!
ReplyDeleteThey look great!! Love that you can change them. I made something similar and added a photo of my boys. Great project. http://dandelionsanddustbunnies.blogspot.com/2011/01/photo-display.html
ReplyDeleteI featured you over @ Time to Shine: http://adiamondinthestuff.blogspot.com/2011/02/time-to-shine-features.html Feel free to grab a "featured" button!
ReplyDeletevisiting from Under the table and dreaming.... I read the Shanty sisters too and I just "Love" what you did with these! So perfect for V day:-)
ReplyDeleteSuper Cute - I love the way you made them versatile. I actually saw that same post and would love to make some of these myself!
ReplyDeleteI would love for you to come and share at my Fantastic Friday link party this Friday. http://ironvioletdesigns.blogspot.com
Thanks
I featured this on a few of my favorite tutorials for the week
ReplyDeletehttp://modernwivelyhood.blogspot.com/2011/02/few-of-my-favorite-tutorials_668.html
Love them, they are so cute!
Thanks for sharing these beauties at Fantastic Friday. I hope that you will join us again today and share some more of your great ideas!
ReplyDeleteHi, friend! I'm admiring all your creative posts here. Can you please share them with us at the Creative Bloggers' Party & Hop? Hope to see you there :)
ReplyDelete